Okay quick disclaimer before I kick this off — this post does not cover how to use interactive Vue components in an Eleventy project. This post covers using Vue entirely server-side! The client will not receive any Vue code.
All of the code for this project can be found in this repo on GitHub.
TL;DR
If you’re using Eleventy because it’s lovely, but like using Vue syntax to handle single-file components, template merging, interpolation, etc, I’ve got your back. This post teaches how to start a new project in Eleventy, integrate eleventy-plugin-vue, and deal with any arising quirks or idiosyncrasies.
Getting Started
This tutorial assumes you have Node and NPM installed. If you don’t yet, you can head over here to get that running on your machine. Once that’s in place, we can create a new directory, initialize it as a Node project, and install the two dependencies we need to get cookin’.
mkdir eleventy-vue-tutorial && cd eleventy-vue-tutorial

npm init # you can use the -y flag to skip the init setup

npm install -D @11ty/eleventy@beta @11ty/eleventy-plugin-vue
Let’s also create some standard directories for an Eleventy project. I personally prefer to keep my app code in a src directory, and reserve the base for configuration and meta files (like package.json, .eleventy.js, .prettierrc, etc.) but for this tutorial we’ll do as little opinionated configuration as possible!
mkdir _data _includes
Creating The Eleventy Configuration and Scripts
To get any of this working, we’ll need to add our configuration file to use the Vue plugin in our app. First, we’ll create our .eleventy.js file in the base directory of the project and populate it!
const eleventyVue = require("@11ty/eleventy-plugin-vue"); // import the plugin

module.exports = function (eleventyConfig) {
  eleventyConfig.addPlugin(eleventyVue); // tell Eleventy about the plugin
};
Eleventy Experimental Features
Here’s the first quirk of this process. At the time of writing, the default installations for eleventy and eleventy-plugin-vue rely on an experimental feature of Eleventy for Custom File Extensions. I’ve gotten around this requirement by installing the @11ty/eleventy@beta package, which implements custom file extensions as a feature.
To add the necessary scripts, we’ll go to our package.json file, and add the following:
{
  "scripts": {
    "start": "npx @11ty/eleventy --serve",
    "build": "npx @11ty/eleventy"
  }
}
If for some reason you can’t use Eleventy 1.0.0, that’s actually fine, you’ll just edit your scripts to activate the experimental features flag:
{
  "scripts": {
    "start": "ELEVENTY_EXPERIMENTAL=true npx @11ty/eleventy --serve",
    "build": "ELEVENTY_EXPERIMENTAL=true npx @11ty/eleventy"
  }
}
Layouts, Data Files, and Vue Templates
In this section, you’ll create a layout, specify it as the default layout, and create your first Vue page template.
Creating A Layout
As reported in the eleventy-plugin-vue README.md, you can’t use .vue files as base layouts, so what we’ll do instead is create a layout.html and specify it as the global layout template. This file will use some Nunjucks templating, so, sorry, you can’t escape it entirely (yet).
First, create a file _includes/layout.html, and populate it with the absolute bare minimum code to make this tutorial work!
<!DOCTYPE html>
<html lang="en">
  <head>
    <meta charset="UTF-8" />
    <meta http-equiv="X-UA-Compatible" content="IE=edge" />
    <meta name="viewport" content="width=device-width, initial-scale=1.0" />
    <title>{{ title }}</title>
  </head>
  <body>
    {{ content }}
  </body>
</html>
Note those {{ title }} and {{ content }} tags. These will use the Eleventy data engine to inject our page’s HTML from our Vue templates. You can read more about how that works in the Eleventy documentation.
Next, we’ll need to tell Eleventy to use that file as the default layout. This is as simple as creating a layout.js in our _data directory and inputting the following JavaScript:
module.exports = "layout.html";
Adding Our First .vue Template
Now we can get into the actual Vue side of things. Let’s create our first page template, which, for now, will just have some content and set the page title.
I’m using Vue 2 for this tutorial, but Vue 3 is supported! I haven’t gone through all of these steps with Vue 3 syntax to find the challenges the new API presents.
We’ll create a file index.vue at the base of our app.
<template>
  <article>
    <h1>This is a test</h1>
    <ul>
      <li v-for="(listItem, index) in listItems" :key="index">{{ listItem }}</li>
    </ul>
  </article>
</template>

<script>
  export default {
    data() {
      return {
        title: "Wow I'm So Excited To Use Vue In My Templates!",
        listItems: [
          "This is the first item",
          "This is the second",
          "This is perhaps the third, though who could truly say.",
        ],
      };
    },
  };
</script>
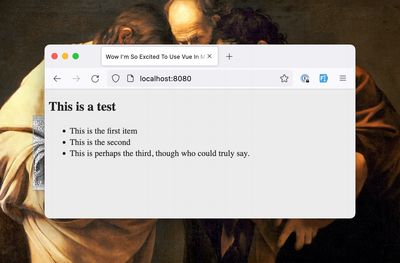
The way the eleventy-plugin-vue works is by simply rendering the <template> tag and making that the content data property in the Eleventy cascade, and in the same stroke using the Vue data object as additional page data. Your page should look something like this:

Here, we used Vue iteration to turn an array of strings into an unordered list. You’ll even notice that the layout.html file automatically used the title data property as the title of the page. Nice work on this one, really just top notch work.
Rendering Content and Pagination
Rendering content from either an API like Contentful introduces some challenges. Let’s create a fake Markdown blog post API response and a post template.
In our _data directory, we can create a posts.js file that just exports a JSON array of posts, like what we might expect from a headless CMS API response.
module.exports = [
  {
    title: "This is a test blog post",
    slug: "this-is-a-test-blog-post",
    content:
      "## Subtitle\nLorem ipsum dolor sit amet consectetur adipisicing elit. Repellendus, vero, odit animi praesentium obcaecati autem velit, labore voluptates itaque consequuntur ea reprehenderit quod eveniet nobis perspiciatis neque quas cum voluptatum.",
  },
  {
    title: "This is another blog post",
    slug: "another-blog-post",
    content:
      "Lorem ipsum dolor sit amet consectetur adipisicing elit. Repellendus, vero, odit animi praesentium obcaecati autem velit, labore voluptates itaque consequuntur ea reprehenderit quod eveniet nobis perspiciatis neque quas cum voluptatum.",
  },
];
Next, create a file posts/_slug.vue which will be the template for our rendered blog posts.
<template>
  <div>
    <h1>{{ post.title }}</h1>
    <div v-html="post.content" />
  </div>
</template>

<script>
  export default {
    data() {
      return {
        pagination: {
          size: 1,
          data: "posts",
          alias: "post",
        },
        permalink: (data) => `posts/${data.post.slug}/index.html`,
        eleventyComputed: {
          title: (data) => data.post.title,
        },
      };
    },
  };
</script>
There’s a couple of things to note in that <script> tag:
- In the
dataobject, we’re returning apaginationentry — this is straight from the Eleventy docs, just converted to fit the Vue format! - Our
permalinkentry is a function that takes data from the paginator and returns the URL we want to render the page at. - This last one is tricky, and I’ve wrestled with it a couple of ways, but what I found was that to dynamically get information from
datafrontmatter, that is, to make available elsewhere in the data cascade, we can useeleventyComputed(not to be confused with Vue computed data) to return thetitlefrom the paginated data.
At this point, we can visit one of our blog posts at http://localhost:8080/posts/this-is-a-test-blog-post/ and see it rendering out for the most part. The next thing we’ll have to reckon with is that our Markdown isn’t being interpreted as Markdown, but that’s easily resolved using actual Vue computed data!
Let’s change this template around to use markdown-it to render our content.
markdown-it comes as a dependency of Eleventy, but we can manually install it as well so our package.json is a more accurate representation of the project’s dependencies.
npm i -D markdown-it
<template>
  <div>
    <h1>{{ post.title }}</h1>
    <div v-html="body" />
  </div>
</template>

<script>
  // import and initialize our markdown renderer from markdown-it
  const markdownRenderer = require("markdown-it")();

  export default {
    data() {
      // ...
    },
    computed: {
      body() {
        return markdownRenderer.render(this.post.content);
      },
    },
  };
</script>
We’ve added that computed property which has one body() function, which just takes the content from the paginated post and passes it through the markdown renderer. Things ought to be looking much better now.
Takeaways
- You can use the Eleventy
paginationobject to create multiple pages from a single Vue template. - If you need to make data from a paginated page available higher in the data cascade (e.g. the page
titlein this case), useeleventyComputed. - If you need to transform data within a Vue template, you can use the Vue
computedorfilterproperties, just like in a Vue single-page application.
Using Vue Components
Of course, a lot of the reason for using Vue templates is the single-file component architecture pattern. That works just fine in Eleventy as well! Let’s create a <Navigation /> component for use in our home page.
First, we’ll create the file _includes/Navigation.vue,
<template>
  <nav>
    <a href="/">Home</a>
    <ul>
      <li v-for="post in posts">
        <a :href="`/posts/${post.slug}/`">{{ post.title }}</a>
      </li>
    </ul>
  </nav>
</template>

<script>
  export default {
    props: ["posts"],
  };
</script>
Then in our index.vue template, we can import and reference the component.
<template>
  <article>
    <Navigation :posts="posts" />
    <!-- ... -->
  </article>
</template>
<script>
  import Navigation from "./_includes/Navigation.vue";

  export default {
  	data() {
  		//...
  	}
  	components: {
  		Navigation,
  	},
  }
</script>
This is a pretty rudimentary example, but some things to note, again:
- There’s no automatic aliasing or resolution as there is in other static Vue implementations, like Nuxt, so you have to reference your components by a full path to the file.
- Components will have access to the Eleventy-supplied
pageobject, but not necessarily data from the_datadirectory. If I need to reference data from the_datadirectory, I just pass it as a prop from the page template to a child component!
Everything else is more or less the same!
Using Single-File Component CSS
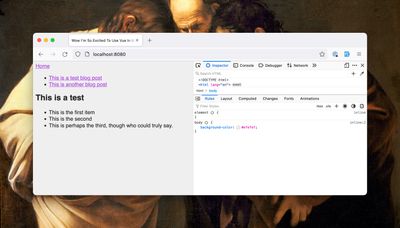
eleventy-plugin-vue does have support for using single-file <style> tags, there’s just a little additional setup. In our index.vue template, we can add a style tag with some arbitrary styles:
<template>
  <!-- ... -->
</template>

<script>
  export default {
    // ...
  };
</script>

<style>
  body {
    background-color: #efefef;
  }
  article {
    font-family: sans-serif;
  }
</style>
Now we’ll need to collect the CSS from each relevant file component and output it in the page — there’s a convenient filter for that, which we’ll add to our _includes/layout.html like so:
<!DOCTYPE html>
<html lang="en">
  <head>
    <!-- ... -->
    <style>
      \{\{ page.url | getVueComponentCssForPage }}
    </style>
  </head>
  <!-- ... -->
</html>
We can also, should we so desire, add the scoped attribute to our style tag to leverage Vue’s scoped CSS features.
I avoid doing so because it’s a bunch of extra specificity and for what?

Everything ought to be workin’ just fine now. Nice work there, my friend, really just tremendous.
Conclusion
There are more idiosyncrasies to this implementation, and in a lot of cases you may decide it’s easier to use Nunjucks or a more standard Eleventy template language! That’s fine, I certainly don’t take it personally. I like Vue for the single-file architecture, the ability to do in-file data transformations, and the clean interpolation/iteration/templating syntax!
I’ll update this post as I learn how to do more things, such as:
- Use Vue 3 lol
Thanks to my king Zach Leatherman for pointing out the spots in this blog where I was being a doofus, and Robb Owen for proof-reading me to safety while I was recovering from vaccine brain.
