I recently* built this really cool feature for my personal website that allows me to use Netlify Functions to show my most-recently-listened-to tracks from Spotify.

It wasn’t recently, it was in July 2020, please don’t look behind the curtain.
It’s an easy way to show some personality, and mostly just an excuse to get friendly with Netlify Functions. While the authorization flow for Spotify’s API initially threw me for a bit of a loop, this became a really fun way to spend an hour or two.
- Check out the code for this at the GitHub Repo
- Or check out the deployed version of this site
TL;DR
Here’s a basic outline of what we’re going to do to get this working today:
- Setting up a basic application to display our track info.
- Writing a basic callback function for Spotify authentication
- Setting up an app in Spotify For Developers
- Authenticating that app using Postman and Netlify Dev
- Writing a Netlify Function to request data from the Spotify API
- Rendering the response in HTML
This article won’t cover a fully-featured loop for managing authentication, refresh tokens, refresh timeout, etc. That would probably require a database and other infrastructure, and we don’t need that noise to make this work. ⚠️ This is probably not the way to make a very very secure serverless auth loop! ⚠️ It’s just a fun tech demo. Be safe.
Initial Setup & Prerequisites
It’s dangerous to go alone. You’ll need these:
- Node.js and NPM
- Postman
- Netlify CLI
Node/NPM will let us set up the Netlify CLI tool that makes using Netlify functions Really Quite Convenient, and we’ll use Postman as an interstitial step during authentication.
To install Netlify CLI globally on our machine, we’ll run the following in our terminal:
npm install netlify-cli -g
Then we can use the CLI to log in to our Netlify Account:
netlify login
That’s all we need for initial project set up.
File Structure
We’ll create a new directory for this project, and in it we’ll create two directories, src and functions, as well as a netlify.toml file, which will contain our Netlify Functions configuration.
In the src directory, we’ll create an index.html, and in functions we’ll make a file callback.js. This is the function that will capture our initial authentication information from Spotify.
We’ll also initialize an npm project so we can run the development functions.
npm init -y
(The -y flag on npm init just accepts the default options so we can breeze through this.)
Once we’ve gone through these steps, our project directory ought to look something like this:
functions/
└─ callback.js
src/
└─ index.html
netlify.toml
We’ll put some very basic HTML in our index.html file for now, just to make sure everything’s working.
<!DOCTYPE html>
<html lang="en">
  <head>
    <meta charset="UTF-8" />
    <meta name="viewport" content="width=device-width, initial-scale=1.0" />
    <title>Document</title>
  </head>
  <body>
    <h1>Hello world!</h1>
  </body>
</html>
Our last setup step is to configure our netlify.toml so Netlify knows where to look for our site files and Lambda function files:
[build]
    publish = 'src'
    functions = 'functions'
And it’s as simple as that, folks. Moving right along.
Setting Up The Callback
Our callback function doesn’t need to do much; just receive an authentication code from Spotify when we initially connect to the API. I made mine very simple — literally all the function does is return a stringified version of the query string it receives and a 200 response code.
For a Netlify Function, we just need to export a method called handler that takes some information and returns a basic response. Here’s the code I wrote for functions/callback.js:
exports.handler = (event, context, callback) => {
  callback(null, {
    statusCode: 200,
    body: JSON.stringify(event.queryStringParameters),
  });
};
To test that this is working, we can start our Netlify CLI dev server by running the following in our Terminal:
netlify dev
Once it gives us that blessed “Server now ready on…” message, we can go to the URL and see our HTML file. We can also test out our callback function by visiting its url with any test query string, perhaps something like this? If everything’s set up correctly, it ought to display some JSON.
Setting Up A Spotify App
Next, we’ll need to set up a Spotify app with the correct permissions so Spotify can share our listening information.
We’ll head over to the Spotify For Developers dashboard right here, log in with our Spotify account, and click “Create An App”. We can call it whatever we want, and give whatever description.
Let’s first make sure to copy down the Client ID and Client Secret from the dashboard. We’ll need these in just a moment.
Once the app is created, we’ll go to “Edit Settings”. This is where we’ll fill in our Redirect URI, which is the path to our local callback function: http://localhost:8888/.netlify/functions/callback.
That’s all for this step, GG EZ.
Authenticating The App Using Postman and Netlify Dev
Now we’ll need to get some API client credentials, and authenticate for the first time. The goal here is to get a refresh token from the Spotify API, which we can use to repeatedly authenticate our API requests.
For this step, make sure your local Netlify Dev server is still running. Then we can open Postman and create a new request with the following details:
- Set the method to GET.
- Set the URL to
https://accounts.spotify.com/authorize - In the params tab, we’ll add four parameters:
client_id: We’ll set this to the Client ID we copied down earlier.response_type: “code”redirect_uri: Set this to exactly the URL we specified in the app setup.http://localhost:8888/.netlify/functions/callback
Next, you’ll need to acquire some API client credentials and authenticate for a first time. Open Postman and create a new request. Set the method to GET and the URL to http://localhost:8888/.netlify/functions/callback. In the params tab, you’ll add four parameters:
client_id: Set this to the client ID you copied down earlier.response_type: Just set this tocode.redirect_uri: Set this tohttp://localhost:8888/.netlify/functions/callback.
I found out while doing this the first time that a difference in trailing slashes will actually make this not work, so be very certain you’ve copied the URL exactly.
scope: This determines what Spotify endpoints your authentication code will have access to. In the feature for my site, I only needed to use theuser-read-recently-playedscope. You can totally mix this up, just take a look at the documentation here to figure out which you’ll need.
Copy the URL Postman assembles for you out of the URL field and paste it into your browser. You’ll be prompted to sign into Spotify and accept the permissions you designated in the scope parameter, and then redirected back to your callback endpoint — which should give you something like this!
{
  "code": "AQBOoEdTAXroVVK1uI5Ym49LQI2T8Nz7WT2PIlqlfo4iHZ7bPY6msLnmOMnxlRNqAWfQmi3FZFkfHQJW8A3x1RK1QOr8UsfeSDnik_dfnrErFnQM"
}
We’ll copy down the code to use very soon.
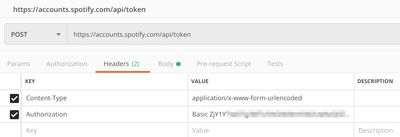
We’ll start a new Postman request, this time with the POST method. We’ll set the URL of this request to https://accounts.spotify.com/api/token, per the Spotify API Authorization guide. In the Headers tab, we’ll add two entries, the first of which is:
Content-Type:application/x-www-form-urlencoded
The second entry is a little more involved. The key should be Authorization, and then we need to base64 encode our Spotify Client ID and Client Secret, in the following format:
client_id:client_secret
We can do this with the browser btoa() function or Node’s Buffer.from().toString(‘base64') functionality, or you can just paste it into this convenient CodePen I made specifically for you.
The end result that you’ll plug into Postman will be something like this:
Authorization:Basic andThenTheLongbase64StringThatProbablyEndsWithAnEqualsSign=

If you’ve made it this far, I’m so unbelievably proud of you. This part felt really convoluted and confusing to me when I did it. You’re doing great. You’re 10x the developer I’ll ever be.
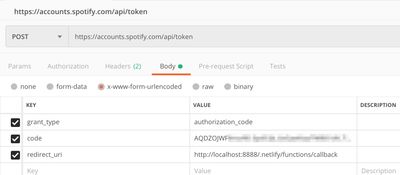
Next, we can move on to the Body tab of the request, and enter the following parameters:
grant_type:authorization_codecode: We’ll set this one to the code we got back from the first request!redirect_uri: Same as last time, we’ll set this to the same local URL (http://localhost:8888/.netlify/functions/callback)

Now, we can run the request. We’ll get back a block of JSON something like this:
{
  "access_token": "moreRandomCharacterStringsHuzzah",
  "token_type": "Bearer",
  "expires_in": 3600,
  "refresh_token": "AQC2kGL-HJ6QgonZju7rDTikEU5_g_FG6y39izdPShgpQStzyYXtqQ3CkALS-YbnrnD6SImvISnmqkN2swXYGSAYdc0fmkeBcb3ZClYXVI9gETZ6HoP0NsKq1zUiWVJT4Q4",
  "scope": ""
}
Like I said before, a cleverer developer might work out a solution for storing access_tokens, checking if they’ve expired, and refreshing conditionally. For this tutorial, we can use the same refresh_token repeatedly, and that allows us to circumvent using a database, etc., so that’s the approach I’m taking.
The refresh_token is exactly what we need to move on to setting up the actual Spotify request in a Netlify function.
Writing The Spotify x Netlify Function
This is where the magic happens. By the end of this step, we’ll have accomplished a whole bunch of things:
- Managing credentials in a local environment.
- Creating a new Netlify Function to do all our Spotify request magic
- Asynchronously fetching authorization from the Spotify API, and then
- Fetching our most-recently-listened-to song from the API using that authorization.
- Cleaning up the data for when we need to access it.
Managing Environment Access Credentials
Since we’re tracking secret credentials in our environment that we’ll store in the Netlify dashboard, let’s install dotenv so we can still do some local development. While we’re at it, we’ll also install node-fetch, which we can use to make browser-style fetch requests from our function
npm install dotenv node-fetch
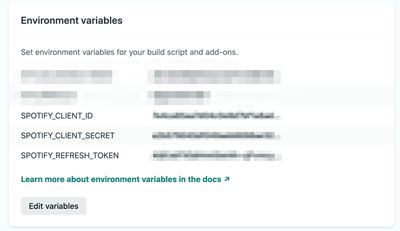
We’ll create a file called .env in the root directory of our project. Inside that file, we’ll add our requisite environment variables.
SPOTIFY_CLIENT_ID=e8d7bf1a8ada357a77e4ca85aa7d04c0
SPOTIFY_CLIENT_SECRET=8ae32502d01aa2b579045df049aeb669
SPOTIFY_REFRESH_TOKEN=AQC2kGL-HJ6QgonZju7rDTikEU5_g_F...
⚠️ Don’t ever commit this file! It is now full of great and terrible secrets, and should be hidden from mortal eyes. ⚠️
Instead, when you deploy your site to Netlify, you’ll add these variables to the Build & Deploy > Environment section in your Netlify dashboard:

Creating Another Netlify Function
Let’s create a new file in our functions directory — I called mine spotify.js but whatever works for you is gonna be perfect.
At the top of the file, we’ll require() the dependencies we need and initialize our dotenv configuration so our function is aware of that .env file. We’ll also add the basic async wrapper for a Netlify function:
const fetch = require('node-fetch');
const dotenv = require('dotenv');
dotenv.config();

exports.handler = async (event, context) => {
  // logic and ✨ magic ✨ will go here...
};
Fetching Authorization From the Spotify API
Because we don’t have a system for managing authorization timeout and refresh tokens, we’ll need to get an access token from the API every time we request it.
We can do that by setting up basically the same request we did in Postman, but in JavaScript — and this time, instead of an authorization code grant, it’s a refresh token grant. We’ll add this JS to our function:
exports.handler = async (event, context) => {
	// Get the refresh token we stored as an environment variable
  const refreshToken = process.env.SPOTIFY_REFRESH_TOKEN;

  // Do the base64 encoding we did earlier but with Node tools
  const auth = Buffer.from(`${process.env.SPOTIFY_CLIENT_ID}:${process.env.SPOTIFY_CLIENT_SECRET}`).toString("base64");

  // Store the Spotify API endpoint for readability
  const tokenEndpoint = `https://accounts.spotify.com/api/token`;

  const options = {
    method: "POST",
    headers: {
      Authorization: `Basic ${auth}`,
      "Content-Type": "application/x-www-form-urlencoded",
    },
    body: `grant_type=refresh_token&refresh_token=${refreshToken}&redirect_uri=${encodeURI(
      process.env.URL,
      +"/.netlify/functions/callback"
    )}`,
  };
Next, we can asynchronously declare a variable accessToken that, once we’ve received it, we’ll use to actually query the API. After the options object, we’ll add the actual request.
const accessToken = await fetch(tokenEndpoint, options)
  .then((res) => res.json())
  .then((json) => {
    return json.access_token;
  })
  .catch((err) => {
    console.err(err);
  });
For more information on the way fetch works, check out the MDN article on this bad boy.
Fetching The Most Recent Song
Now we can make our actual request to the Spotify API. We’ll start by adding a variable to track the endpoint we have to hit (I grabbed this from the Spotify API reference). I added this right after the const tokenEndpoint we declared earlier:
const playerEndpoint = `https://api.spotify.com/v1/me/player/recently-played`;
Then, we can return the results of a fetch call to the API:
// That `?limit=1` part is because I only want the API to return a single song.
return fetch(`${playerEndpoint}?limit=1`, {
  method: 'GET',
  headers: {
    Authorization: `Bearer ${accessToken}`,
  },
})
  .then((res) => res.json())
  .then((json) => {
    // transform the results here.
    console.log(json);
  });
This is almost ready to test and adjust — but first, to make this a real Netlify function, we need to return an object that contains a statusCode and body.
.then(json => {
	// transform the results here
  return {
    statusCode: 200,
    body: JSON.stringify(json),
  };
});
Hell yes, brother. Excellent work.
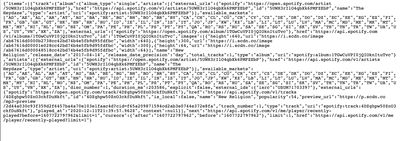
As long as we didn’t stop our Netlify Dev server, we ought to be able to go to http://localhost:8888/.netlify/functions/spotify in our browser and see a big dump of Spotify’s response to our request.

Data Cleanup
For my purposes, I needed the song URL, the artists, the song title, and maybe the album art, so I did a little data massaging:
// Start by destructuring the items from the json response
.then(({ items }) => {

	// Let's do a little more destructuring assignment to take only what we need from the response
  const {
    artists: artistsArray,
    name,
    external_urls: urls,
    album,
  } = items[0].track;

  // We want to keep the array of artists in case there's a track feature, etc.
  const simplifiedArtists = artistsArray.map((artist) => ({
    name: artist.name,
    url: artist.href,
  }));

  // Lastly, make the url/artwork references more specific
  const trackUrl = urls.spotify;
  const artworkUrl = album.images[1].url;

  // And then return a stringified object that contains all the data we want to render!
  return {
    statusCode: 200,
    body: JSON.stringify({
      artists: simplifiedArtists,
      name,
      trackUrl,
      artworkUrl,
    }),
  };
});
That’s all we need to do! Refreshing the localhost URL of the function should give us a JSON string that only contains the data we need. Depending on how you want to use this data, you can be done here, or keep reading to learn how to render this data to the browser.
Rendering The Spotify Response to HTML
If we had some sort of server-side build task, we’d make a request to the function in that build, but in this case, we’re going to make the request client-side.
In our src directory, let’s make an index.js file and link that file in our HTML. In this step, we’ll also add a template that we’ll render data to:
<body>
  <h1>Hello world!</h1>
  <p>My most recent listening on Spotify:</p>
  <div class="spotify"></div>
  <script src="index.js"></script>
</body>
Next, we’ll add some code in that index.js file to hit the Netlify Function endpoint we created:
fetch('/.netlify/functions/spotify')
  .then((res) => res.json())
  .then((data) => console.log(data))
  .catch((error) => console.error(error));
Accessing our project via the Netlify Dev localhost URL ought to show us the results of that in the console:

EZ.
All that remains is templating that data and injecting it into our HTML!
This, obviously doesn’t adhere to best practices of progressive enhancement. This page should work even if client-side JavaScript fails, but for the sake of this demo and tutorial, we’ll accept a half-finished solution.
Here’s my final index.js file, which uses some template literals and destructuring assignment to shape the data exactly how we want.
const spotifyWrapper = document.querySelector('.spotify');
const artistTemplate = (artistObject) =>
  `<a href="${artistObject.url}">${artistObject.name}</a>`;

fetch('/.netlify/functions/spotify')
  .then((res) => res.json())
  .then(({ trackUrl, name, artists, artworkUrl }) => {
    spotifyWrapper.innerHTML = `<div class="song">
            <a href="${trackUrl}">
                ${name}
            </a>
        </div>
        <div class="artists">${artists
          .map((artist) => artistTemplate(artist))
          .join(', ')}</div>
        <img class="artwork" src="${artworkUrl}"/>`;
  })
  .catch((err) => console.error(err));
Conclusion
So thanks for reading, I hope this was super cute and fun and helpful. I love Netlify Functions, they make Lambda/serverless tasks really accessible — especially as I’m not personally much of a back-end developer. If you have any issues, questions, comments, concerns, or professions of love and/or eternal hatred, [get at me on Bluesky]({{ ‘bluesky’ | getSocialUrl(social) }}). I’m happy to update this post at any point to go into more detail about specific aspects, so please def reach out!
- The code for this tutorial can be found here on my GitHub page.
- A live version of the site is deployed with Netlify right here.
Colophon
- Photo by Dylan Leagh on Unsplash
