Contentful is an immensely well-featured headless content management system, but the density of its featureset can be daunting to integrate with static site generators. The great news is, Eleventy is so well-designed and modular — it doesn’t have to be nearly so challenging.
TL;DR
Contentful has a REST content delivery API and a GraphQL API. This post covers using the REST API to query blog posts from Contentful and render the returned data in an Eleventy project, as well as create multiple pages from that data.
What About GraphQL?
Okay, I meant for this to be one paragraph about why I’m just covering REST but it ended up being kind of a lot, feel free to skip this section lol.
I know a lot of folks find GraphQL quite useful! That’s very nice, but for now I’ve only elected to use a RESTful integration of Contentful, for a few reasons.
My understanding is that GraphQL excels when dealing with multiple data sources, or when trying to be thrifty with bandwidth on the client-side. It provides these optimizations at the cost of additional infrastructure and complexity.
As far as reducing bandwidth goes, it’s a non-issue here — since Eleventy makes its data requests server-side, it’s not critical for us to be so frugal with limiting requests because the user will be served flat files and no client-side JavaScript payload nor client-side requests after the fact.
Lastly, in terms of proliferation, nearly 82% of API practitioners and consumers use a REST style, according to SmartBear’s 2020 State of API report, whereas only 19% use GraphQL. That’s still a sizeable chunk to be sure, but it’s at least self-evident that the likelihood you’ll be integrating a GQL API with Eleventy any time is smaller than a RESTful one.
Creating A Contentful Content Type
This post assumes you’ve already created a Contentful Space — if you haven’t, I recommend you head over to read about how to get started with Contentful.
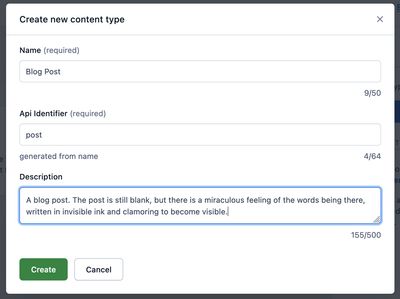
Let’s begin by creating a content model — in this tutorial, we’ll create a simple blog-style article. When logged in to our Contentful space, click “content model” and then “Add content type”. You can call this a “Blog Post”, and just use post as the API identifier. Feel free to use whatever you want as a description, or skip it entirely.
If you’ll have content editors in the dashboard that aren’t you, it’s good manners to leave a meaningful description of what this content model will represent, not matter how obvious it might be to you.
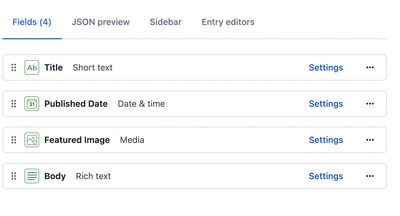
Now we can add some fields. For this example, let’s add some Text, Date, Media, and Rich Text fields, in the form of a blog title, publish date, featured image, and body.
Some Things To Note As You Add Fields
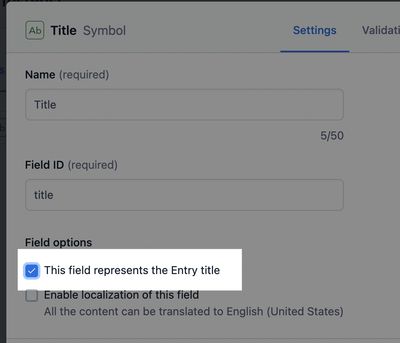
- Make sure the Title is designated as the Entry title in Contentful.
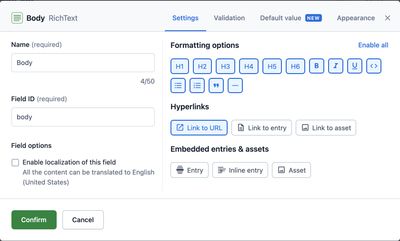
- When adding the rich text
bodyblock, I’m disallowing hyperlinks to other entries, links to other assets, or embedded entries/assets, inline or otherwise. There are some aspects of this sort of extension of Contentful that are extremely powerful but require some additional setup to render.
Once you’ve added each of these fields, you’ll have something like this.
Now let’s create a blog post using this content model and populate it with some placeholder content that we can query and render on the Eleventy side.
Switch to the Content tab and click “Add entry”. When prompted, select the Blog Post content model type. You can fill all of these fields with lorem ipsum, or use an actual blog post if you want! (I’m intentionally using different text formatting options in the body so I can take full advantage of the HTML renderer we’ll be leveraging later.)
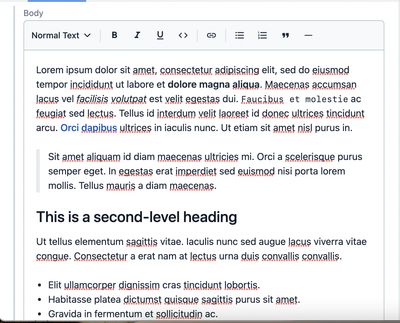
That’s all we’ll need from the Contentful side until we get our Eleventy site going, at which point we’ll need to come back to this dashboard to get some API credentials!
Creating An Eleventy Project
You can start from scratch or if you’re an old Eleventy pro, you can skip down to where I write about requesting data from Contentful.
Initial Setup
First, you’ll create a new directory for the project to live in, initialize it as a Node project, and install some dependencies. In your terminal, run the following:
mkdir eleventy-contentful-tutorial && cd eleventy-contentful-tutorial
# fun fact, if you're on a Mac you can just do `take eleventy-contentful-tutorial` to create and immediately navigate into a directory.

npm init # you can use the -y flag to skip the init setup

npm install --save-dev @11ty/eleventy contentful @contentful/rich-text-html-renderer dotenv
Since all these dependencies are used to build the site, and not served in production (11ty: It’s Just HTML™), we can npm install -D to install these packages as development dependencies.
Let’s quickly create some standard files and directories for an Eleventy instance. Run these commands in your terminal as well:
mkdir _data _includes # create two directories
touch index.njk _includes/layout.html # create two files
In our base _includes/layout.html template, add the bare minimum HTML required to make this example work:
<!DOCTYPE html>
<html lang="en">
	<head>
		<meta charset="UTF-8">
		<title>How To Use Contentful With Eleventy</title>
	</head>
	<body>

	</body>
</html>
We’ll be using Nunjucks for this tutorial because it’s the most plug-and-play templating syntax and it’s fairly standard throughout the Eleventy docs. You can use all sorts of templating languages with Eleventy, including Vue, if you’re a bit of a whacko.
In our index.njk, we’ll add some basic Nunjucks code to specify that we want to use the layout.html file, and then render some text.
---
layout: layout.html
---
<main>
    <h1>A brave new world, indeed.</h1>
</main>
Now, you can run npx @11ty/eleventy --serve to start hot-reloading this Eleventy project at localhost:8080.
Requesting Data From Contentful
With Eleventy, you can use JavaScript files to make requests to data sources at build time. We’ll create our first file to request all of our posts (or, just the one, I guess) from Contentful.
First we need to get some API credentials from Contentful and put those in a new .env file. In your Contentful dashboard, navigate to “Settings” and then “API keys”, then click “Add API key”. For the name, I usually use the URL of the site, but it just needs to be meaningful to you.
Once you’ve saved this, you’ll be given a Space ID and Content Delivery API - access token. Copy those down into a file .env at the root of your Eleventy project:
CTF_SPACE_ID=fnmde2k23...
CTF_CDA_ACCESS_TOKEN=HuKYnGA87XYI0cNM...
⚠️ Don’t ever publish your .env file. ⚠️ It contains secrets. Don’t commit it to git, don’t text its contents to your tight homies.
Creating A Contentful Client
We now need a Contentful client with which to ask the content API for posts. Let’s create a file utils.js in the root of our directory and create our client in there, using the dotenv package we installed earlier to reference our local .env variables.
require('dotenv').config();
const contentful = require('contentful');

const contentfulClient = contentful.createClient({
  accessToken: process.env.CTF_CDA_ACCESS_TOKEN,
  space: process.env.CTF_SPACE_ID,
});

exports.contentfulClient = contentfulClient;
When I have multiple content types, I prefer to create the client once and import it in each Eleventy _data file that needs it. If you prefer to re-initialize the client in each file, that’s your prerogative. I’m proud of you for knowing what you believe in.
Creating Our Request
Now we can create a JavaScript file in the _data directory that will grab all our posts when we run Eleventy. You can call it _data/posts.js so you’ll be able to reference the data it returns as posts in your templates.
// import the client we just created
const client = require('../utils').contentfulClient;

module.exports = async () => {
  // create a request for all entries that match our post type.
  // we can use the `order` property to sort them reverse-chronologically by their published date.
  const posts = await client.getEntries({
    content_type: 'post',
    order: '-fields.publishDate',
  });
  return posts.items;
};
That oughta be working! (You may need to restart your Eleventy script in the terminal.) Now we can render the data in our templates.
Using Data
In our index.njk file, let’s add a Nunjucks tag to dump all the data we just requested to the template.
<main>
    <h1>A brave new world, indeed.</h1>
    \{\{ posts | dump }}
</main>
The dump filter saves us from just getting [object Object] rendered to the template, and instead shows us everything in the JSON object. Think JSON.stringify().
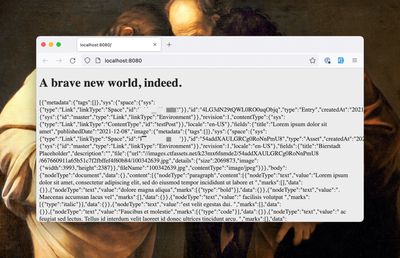
Well, that’s a lot, and mostly unuseful. Contentful offers a JSON view of your content models in the dashboard to make this a little simpler to parse, but I’ll simplify the haystack-digging for the purposes of this tutorial.
You can use Nunjucks to iterate over every blog post (which, for now is only one) in the template:
That’s probably looking much cleaner already. One thing you might notice is that I created a link to a page that doesn’t exist yet, using the title of this post and the built-in Eleventy slug filter. We’ll handle that next.
Creating Post Pages From Data
In this section, we’ll cover the creation of a post template that will autogenerate every individual post page.
Start by creating a file _post.njk at the root of your project and populating it with the following frontmatter:
---
layout: layout.html
pagination:
    data: posts
    size: 1
    alias: post
permalink:  "posts/undefined/index.html"
eleventyComputed:
    title: ""
---
Line by line, what we’ve written accomplishes these things:
- Use the
layout.htmlfile in our_includesdirectory as our layout. - Create some pagination for every entry in posts. We use a size of
1because we only want one post per page. We use the aliaspostto conveniently refer to our post within the template. - Tell Eleventy to put this page at
/posts/slugified-title. - Compute the page title from the data and set the title of the page to this.
Next, add some basic HTML to render the data on the page.
---

---
<main>
    <h1></h1>
    <p>Published on: <time></time></p>
    <img src="?w=400" />
    <div>{\{ post.fields.body | dump }}</div>
</main>
There are some quirks to note here as well.
- Firstly, it takes some serious drilling to actually access the URL of an image asset from Contentful. There are a few ways around this, such as separate requests, modification of asset objects on request time, or even an Eleventy filter to avoid all this dot notation.
- Second, I’ve added a
?w=400parameter to the image URL to make sure we’re not grabbing a huge image every time. Contentful provides a number of image transformations by URL, you can read more about URL image transformation methods here. - Lastly, looks like that Rich Text
bodyfield renders some wild JSON. We’ll fix that next.
Rendering Contentful Rich Text
The “Rich Text” concept in Contentful is extremely powerful, as it allows you to generate your own renderer and custom overrides for how your content is displayed. For this tutorial we’ll use the stock renderer, and won’t extend it for any special embeds.
We’ll install the Contentful renderer as an Eleventy filter. Create a file .eleventy.js at the root of the project, and add the following:
const { documentToHtmlString } = require('@contentful/rich-text-html-renderer');

module.exports = function (eleventyConfig) {
  eleventyConfig.addFilter('renderRichTextAsHtml', (value) =>
    documentToHtmlString(value)
  );
};
(You can learn more about the Contentful HTML renderer here.)
All we’re doing here is adding a global filter that uses the Contentful renderer!
Now in our _post.njk template, you can use the filter right away:
<div>{\{ post.fields.body | renderRichTextAsHtml | safe }}</div>
Here I’m referencing the body field, passing that to the render filter we just created, and then using the built-in safe filter to tell the template not to escape the rendered HTML.
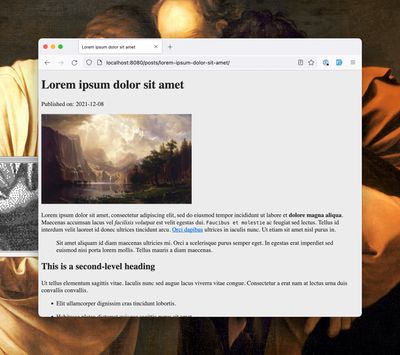
Looking genuinely exceptional, I’d say. You’re great at the work you do. You’re a champion. I love you. We all do.
Conclusion
Feel free to reach out and touch faith on Bluesky if you’ve got questions about this article. It would be great to expand this article upon finding new challenges folks face with this integration. I reckon this could also cover:
- Using the GraphQL API (as mentioned, I’m not particularly an advocate of this approach, but I know some folks like it and want to use it.)
- Extending the Contentful Rich Text engine to render references (it really is incredibly powerful for content creation).
- Previewing content using the Eleventy Serverless plugin and the Contentful preview API.
